With the American Independence day holiday right around the corner I thought it would be timely to have a quick how-to post on shooting fireworks. In the first part of this video I share basic fireworks tips and tricks for getting great shots.
You must have a tripod or something to hold the camera steady or a few seconds. I love the Leofoto Tripod
Use manual mode on your camera - Shutter speeds between 2 and 8 seconds, Aperture f/5.6-8.0, ISO 100-200 if you have a P&S camera use the fireworks scene setting (still need a tripod)
Use a remote release device to trigger your camera- I recommend Intervalometer with multiple connections: http://amzn.to/29xNO3M
Be ready! Some of your best opportunities happen early on, as the smoke builds your shots may get hazy unless you have a breeze removing the smoke. So I suggest you start to setup before it gets dark, frame your composition and take a few test shots - use trees or light poles near the fireworks launch spot to focus on - review the photos watching for stray objects or horizon lines that might distract from the fireworks. If you end up setting up in the dark, use the following tips - set your ISO to MAX and your shutter speed long enough to get a well lit photo, we don't care if it is grainy, we just want to get quick feedback on focus and composition. Once you have those set then use the suggested settings in step 2 for the actual fireworks shots.
Try to time your shots to start just as the rockets head up, longer shutter speeds are going to capture more of the action
Experiment but don't forget to enjoy the show some too
Finally, watch out for the Grand Finale - shorten the shutter speed during that fireworks-heavy period or you will end up with an overexposed image.
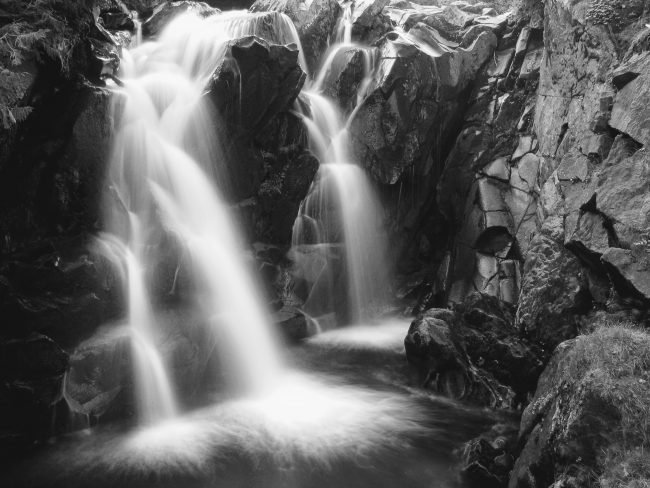
August 2005, I had come out from the east coast on a family vacation. I brought along my trusty Canon G5 P&S and while I was mostly still shooting JPEG I was excited that the camera allowed RAW and full manual control. One morning, before the family woke up, I drove into Mt Rainier NP and found a beautiful little waterfall to photograph. Last week, as I was scouting for an upcoming photography workshop with McKay Photography Academy, I realized I was standing in the same spot, looking at the same waterfall. Almost exactly thirteen years to the date! And a few days later, as we returned as a group I had a few moments to contemplate this wild ride of life and how in no way could I have imagined this life today. I have no deep statement about this other than to say - you are probably reading this because you are at least a little passionate about photography and who knows where life will take you but bring your camera along for the ride! That morning I also captured this shot of Mt. Rainier in Reflection Lake When I returned home I printed these images along with one more of my daughter from the vacation. I matted and entered three photos into our local town fair where they all received a bit of recognition - Honorable mentions and 2nd place in a landscape category! When I went to pick up my photos someone had left a note that they wanted to buy the photo of Mt Rainier. To say I was excited is a bit of an understatement. You see before I had submitted these photos I told myself that if they received any type of recognition I should take that as a sign to get more serious about photography. And not only did I have three ribbons someone actually wanted to pay me money for my photo! Now - I look back at these photos and see quite a few things wrong but there is enough that was right that got me where I am today.
Sometimes it feels like the time I spend posting, hashtagging, captioning is a total time suck. A few tools and tips that can help but really a conversation with you - how are you feeling about Instagram these days?
Auto Publishing
Services like Later.com can help schedule your posts to Instagram, Facebook, and Twitter. Now at least for Instagram, they've finally enabled auto-publishing, saving you from getting the phone out just to post! Check it out at https://later.com/#ref=photorectv
Hashtagging
Hashtags take forever, especially for those wanting to put out 30 for each post. Later.com uses hashtag groups to save time, but you need to change it up. Fortunately, it's hashtag suggestion feature will help a bit, but it needs to be fleshed out more. Instead just stalk your local Instagrammers to see what the popular tags are for your area and try to incorporate some when you can.
Image Tips
Your image quality matters!
Bright images with a strong white point draw people into the photos
Level your horizon, that's that little extra to make people think your photo is worth a like
Clear subjects have to count, get rid of distracting elements so there's a strong focus on your subject
Captions
Connect with your viewer, you need to sell yourself with a good caption for the photo.
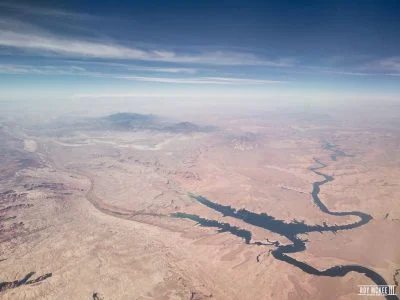
So what the heck did you just shoot a photo of out the plane? As we’re back from Joshua Tree here’s a quick tip for traveling if your the type that loves the window seat for photos. It’s not that hard and gives you a rough idea where you took the shot.
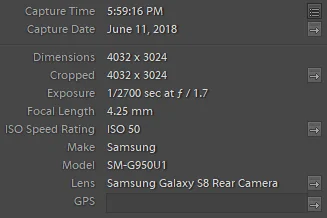
So when you take photos off your phone typically it stays in the time zone that you started in which works out in this case. That gets saved to the photo's metadata which you can get to by hitting info (under … at the top right in android) or pulling it up in Lightroom (bottom of the right panel in the library).
Go to flightradar24.com or flightaware.com and pull up your flight info. Without paying for a plan Flightradar24 only gives you the last 7 days free, Flightaware is 14 days or 4 months with a free account. I’m including both as you might miss the first one coming back from a trip.
Flightradar24 (www.flightradar24.com)Flightradar, in this case, is the easy one. Simply convert your time to UTC, in my case “5:59pm edt to utc” in google brings up 9:59 PM which is 21:59 in military time. So then hit play, skip to that time, and there we go. Albeit the data is usually off a bit but gets you in the ballpark. I shooting a bit behind the plane so this shot is a bit northeast of what the site says. Making this Bullfrog Bay in Glen Canyon National Recreation Area with Mt Ellsworth and Mt Holmes in the background.FlightAware (flightaware.com)
Hit play and skip ahead to your shot time. In comparison, this map isn’t as helpful but overall you get the area and can find it in google maps. If you click on the three lines at the top right of the map you can switch between map sources to get some city names to find in google maps.
https://youtu.be/EwxQlKuIKj8 Make awesome splash photos in your home with the MIOPS Splash Water Drop Kit. Throw in a flash and a colored gel and you can create some EPIC photos with the press of a single button.MIOPS Splash Kit - https://bhpho.to/2LtVwxUSplash Kit Holder - https://bhpho.to/2JgtBooCamera Connection Cord - https://bhpho.to/2JhXp47Cheap flash w/ PC sync - https://bhpho.to/2JnRiaqAlready have a flash? Alternative - https://bhpho.to/2JjCf5mAffordable Flash Gel Kit - https://bhpho.to/2JrcwnyNeed a glass container recommendation: https://amzn.to/2JqgvAQYou can also purchase gear at https://www.miops.com/miops-splash/Camera settingsShutter Speed: BULBISO 100Aperture f/16Flash SettingsManual 1/64 powerMIOPS App SettingsDrop 1: 50msDelay 100mmsDrop 2: 50msDelay: 200ms - Flash ModeFor the purpose of the video you saw me shoot during the daylight hours. The resulting images are ok but I found the best images in a dark room (I just waited until the sun set and turned off all the lights) With the flash on a fairly low power you can get some extremely colorful images.GALLERY of MIOPS Splash Water Drop Kit photos by Toby
A new video with some wildlife photography tips. Get better photos with longer lenses to nail those wildlife shots!
Lenses
Tamron SP 150-600mm
Animals are for the most part shy making a 400mm lens your best bet with 600mm getting even closer for great shots.
Using a longer focal length brings the wildlife to you, letting them take up more of the shot for an impressive photo.
Sigma 100-400mm Contemporary
The Sigma 150-600 C is one of the best values in super telephoto, The Tamron G2 is a little sharper but more expensive. Check out photorec.tv/wildlifegear for recommended gear cameras and lenses for wildlife photography at every budget.
Shutter Speeds
When you are shooting with a longer lens you want to watch your shutter speeds. Typically when photographing it goes aperture first, but when using a longer lens and especially when photographing wildlife, it's shutter speed first.
Focal length rule: Focal Length * 2(Times the amount of coffee you've had)
That means for a 400mm lens you are looking at roughly a 1/800 shutter speed. The rule doesn't account for your subject though, meaning that in cases of faster objects like birds in flight you'll need speeds up to 1/2000 of a second. Going for faster photos first can net you "safe" shots with a higher ISO, meaning more noise, then you can back the speed down a bit for cleaner images. Tripods and IS can help speeds a bit as well keeping things a bit lower as well.
Remember - expose properly, don’t underexpose your image because when you brighten the image in post it is going to get much noisier.
Focus mode - with static or slow-moving subjects a single point is fine - running or flying - a wider array of points really helps the camera track your subject. And switch to Continuous AF for subjects on the move.
Simple tips and tricks for getting the best milky way photos - from when to go, where to go and what gear to use.
When to Shoot
March to October is good but the best times to see the galactic core is late April to late July here in the Northern Hemisphere. In the southern hemisphere February to October with the galactic core best visible during June and July - The galactic core is arguably the most interesting and most photogenic section of the milky - So take a moment and add a calendar reminder to watch this video again in the spring.You also want nights with no moon - this means a new moon or dates when the moon is below the horizon - a quick search online yields lots of helpful info. On iOS and Android, I love Photopills it has at a glance moon info as well as rise/set times for the Galactic core for your location AND a mode that lets you overlay the night sky & milky way on the landscape where you are standing!
Location
Someplace with low amounts of light pollution - to figure out the closest dark skies visit website Dark site Finder - Yellow is eh, Green is ok, blue is good, black is even better. But don’t let this stop you from trying - Your milky way shots might not be the best but at least get out, practice and develop the skills so when you end up at the right time and place you can get THE SHOT.DO include interesting foreground elements - rocks, trees, mountains, something to ground your viewer on earth while giving them a taste of the stars above.
Gear
Irix Firefly
You need a sturdy tripod - I have my favorites listed below. As for lens choice. Full Frame equivalents of 14 to 30 work well for me. The IRIX firefly is my current budget favorite - I have a review of several lenses perfect for astrophotography linked below. You could go fisheye or shoot a panorama if you have a full view of the sky with little light pollution.
Get manual focus during the day and then tape or lock your focus ring at that point.
Aperture - Use the widest your lens allows - f/2.8 is great wider is even better Kit lenses at f/3.5 are a possibility too.
Shutter speed - Probably about 20 seconds but follow the 500 rule and keep that shutter speed as short as possible so stars are pinpoints and not streaks. Taking multiple shots and stacking for lower noise higher detail is an option too - I haven’t done that yet - I have been happy with single shots.
ISO You are probably going to end up around 1600 - lower if you have a faster lens than f/2.8 - higher if you have a slower lens.
In Post
Post Processing I typically cool the image - brighten overall image but especially the stars by increasing the highlights and I use a brush to increase the brightness of the milky way and a second brush to decrease the brightness of the darker sections - overall increasing contrast and making the milky way stand out more.
You are carrying a mini computer with you all the time, why not put it to use? Check out some of our favorite smartphone apps to get your photography going.
Weather Underground (Free)
Google Play
Apple App Store
I like weather undergrounds info and display and they let you set up smart forecasts that can quickly give you an idea of optimal times for various activities including astrophotography.
WU Storm
STORM by Weather Underground (Free)
Apple App Store
Along with weather underground, I use STORM for real-time radar that can be helpful to know exactly when that rain is going to stop at your location. I find watching the radar and the movement of the precip is more accurate in the short term than any forecasts.
NOAA Weather International
NOAA Weather International (Free, $2.99 Ad Free)
Google Play
Apple App Store
AND I sometimes want to know what the weather nerds are saying about the future and the NOAA app gives me a straightforward look at each day and provides an easy click to read the forecast discussion. You can also click to see the elevation of a location on the map. FREE or pay $2.99 to remove the adds.
Tide Charts Near Me
Tide Charts Near Me (Free, $1.99 Ad Free)
Google Play
Apple App Store
I live near the coast and we regularly run workshops on both coasts - knowing the tide is critical to knowing how much beach or rock will be exposed and if the tide is headed out giving you plenty of time to shoot or the tide is coming in when you need to be very careful about getting stranded, Tides- Charts near me is a simple representation of the tides near you - with automatic updating based on your location. FREE or $1.99 to remove the ads.
Photopills
PhotoPills ($9.99)
Google Play
Apple App Store
This is huge and I was pretty happy when they offered an Android app - First I love the widget - at a glance I know sunrise, sunset, moonrise and even the status of the galactic core for my location! Once you dive into the app your find tons of useful info from the planner to the AR that helps you line up for sunsets, sunrises and star trails. Additional calculators further help your planning- tons of useful info and well worth the $10 - you can find most of these items in other apps for free but I haven’t found any that bring them all together in one app.
Squarespace
Squarespace (Free)
Squarespace
The square space app makes it really easy to update your site with posts, photos and even video - The one way to get people to come back to your site again and again and that is to update the content and offer information behind the photos - Squarespace makes it incredibly easy to build a beautiful website and blog and the app makes it really easy to update on the go. Additional apps from Squarespace allow you to track your analytics, keep notes, update your store and more.
It’s fine to put your best work on Instagram but you should have a website where you control everything and display your work professional in a big beautiful way and Squarespace makes it easy to do that - with beautiful custom templates and 24/7 support along with easy custom domains- Get your own website today at
If you are smart about syncing Lightroom mobile can be powerful and recent upgrades have seriously improved the capabilities and stability of the app - almost making it my pick over Snapseed for editing... but go watch my Snapseed secrets it is just so quick and powerful once you know a few tricks. Sound good?
for an easy way to get images and captions to your phone - I hate writing captions and hashtags on my mobile device and recent updates to the paid plan give you the best times to post and suggest hashtags making new posts easy.
I talked about this on my recent Yosemite trip - with a small dongle you can trigger your camera in several different ways - really useful - I will be posting a separate video about this system soon.
This little Bluetooth tracker lets me ping my camera bag and set an alert if it moves outside of Bluetooth range - I have only started using this - certainly not a full proof way to protect your camera bag but at least gives me a little more piece of mind.
The holidays are an ideal opportunity to capture images with friends and family. Taking a few extra minutes to snap photos during a holiday gathering will allow you to look back on the event for years to come. Before you gather with your loved ones this year, brush up on key tips for taking better holiday photos.
Focus on telling a story
It's easy to snap pictures during a holiday family gathering without giving them much thought. While you may capture a few memories, most likely you won't create very strong images. The pictures you do have also won't tell much of a story of the entire event. Even if you're just creating a Facebook album or blog post and aren't putting together a photo book or something more elaborate, it's still nice to have a narrative element to your collection of images. Think about the event as a whole and the images you want to take to convey this larger picture.
Strive to get a combination of candid and posed shots
When a large group of family gathers, I love getting a couple of posed shots to print and put up on the wall. But nine times out of ten, my favorite images from a gathering end up being the candid shots. Pay attention to the smaller moments during the gathering, and seek out opportunities to capture the details of the event as well, such as the place settings or holiday decor. When you are planning to get a few posed shots, think about bringing a tripod and a remote shutter, so you're able to be in a few of the shots.
Get on eye level with the kids
Have you heard the photography advice "move to get the shot?" This trued and true tip applies to taking better holiday photos, too. Instead of snapping a quick shot of your nieces and nephews playing a board game from a standing vantage point, move down to their level. You'll create a more engaging action shot. If little ones aren't comfortable having the camera right in their faces, spend some time just sitting with them to put them at ease, or scoot back to create a bit of a buffer safe zone.
Shoot with a prime lens or external flash
A prime lens is one of the simplest and most affordable ways to create beautiful indoor portraits of friends and family during the holidays. It also offers endless possibilities for creative holiday imagery, such as blurred bokeh Christmas lights. Of course, the 50mm is a classic choice. If you're worried that 50mm will be too tight in a smaller space, the 40mm is a great option. Do you already own a 35mm lens? Bring the 35mm instead of the 50mm.When lighting conditions are particularly limited, an external flash is a great asset, particularly for portraits. The above picture is from one of the few events I've attended in the last few years with a flash, and I'm so glad that I did. Make sure to angle your flash away from your subjects to avoid red eye. If you're new to flash photography, the YN-560 IV is just $65 and has an impressive range of features including supporting wireless master and slave functioning and multiple trigger synchronous mode.
If the weather allows for it, move outside for a few shots
Indoor photography is often challenging, even under the best of circumstances. Depending on the given weather conditions that day, outdoor shooting may not be an option. But if it is, take it. Most likely the breath of fresh air and a chance for a bit of exercise and fun will be a welcomed change of pace. Experiment with taking pictures right in your backyard or head down the street to the local park, especially if you have kids in your group.
Keep your camera handy
I can't tell you how many times I've meant to take pictures at an event or gathering and don't end picking up my camera even once. Sometimes it's fun to enjoy gathering with your loved ones without your camera. But it can also be disappointing to miss an anticipated opportunity for photos. Consider wearing your camera for at least part of the gathering, so you always have it with you. If there are multiple people taking pictures, designate a central spot for the camera, keeping it within easy reach throughout the event.Finally, don't forget to put your camera down for a few minutes. Enjoy spending time with the people you love without looking at them through your lens. Personally, I like to spend a bit of time sizing up a new environment and letting everyone get comfortable before I pull out my camera. Then I'm intentional about wrapping up my shooting well before the festivities die down, so I can relax without my camera in hand for a while. Find a routine that works for you and stick with it to make the most of your holidays while still creating beautiful images.
Do you have any additional tips for taking better holiday photos?
Food photography is all the rage these days, with thousands of Instagram users posting their drool-worthy kitchen creations and restaurant meals everyday. It's easy to assume these photographers are using high-end equipment or are blessed with amazing natural light in their kitchens. While a DSLR camera and gorgeous lighting will help you take better photos, there is a lot more that goes into making stellar food images. The following steps will get you on your way to improving your food photography.
Find the best natural light in your house
The best lighting in the house often isn't in the kitchen. When you do have beautiful light in the kitchen, you may need to move your food away from the stove or counters and over to the window to create crisp, bright images. When you don't have beautiful light in the kitchen, set up your food shoots in a different area of your home that lends itself better to photography.
Alternatively, use artificial lighting
When you're struggling to shoot in the available natural light in your house or don't want the daylight hours to restrict your shooting, consider an artificial lighting setup. When executed properly, artificial lighting produces consistent, bright shots. Typically, I use two desk lamps with daylight bulbs and two DIY Lowel EGO lights for my artificial lighting setup.
Minimize clutter in your shooting space
Getting rid of unnecessary items and other distractions in your food photography is critical for creating clean, focused images that allow the food to shine. When you begin a food photography session, clear your shooting surface of miscellaneous cooking gear and other household items. If you aren't shooting against a neutral background, such as a white wall, create your own backdrop with a wood board, patterned paper, or even poster board.
Add a garnish or other finishing touch to your dish
A garnish or other finishing touch will take any food photography shoot up a notch, boosting your results from casual, amateur shots to polished, professional images. For example, if you're photographing hummus, add a drizzle of olive oil and maybe a few sprigs of parsley. If you're photographing a bowl of soup, top it with a sprinkling of cheese.
Style your food with nice dishes and a couple of props
Choosing dishes and other props specifically for your recipe makes your images more intentional, creating a more powerful visual story. Start with items you already own. Taking the time to style a sandwich on a plate with a napkin and glass of water makes the whole meal together. If you want to expand your prop collection, scout thrift stores and rummage or estate sales for interesting pieces on the cheap. Etsy and eBay are also great options for affordable, unique, vintage items.
Clean up any drops and splatters
You'll complete the polished, professional aesthetic for your images by taking an extra few seconds to wipe up any drips on the plate or pan. If the pot is really dirty or the bowl has more splatters than you can easily wipe up with a single paper towel, plate your food with clean dishes.
Convey interaction with the food
Set up a tripod or enlist a family member or friend to help you with your food photography shoot, so you can create a few interactive shots. Pouring the dressing over the salad or getting ready to lift the soup spoon up to your mouth further adds to the narrative. It will take some trial and error to perfect these shots, but it's well worth the effort.
Experiment with different angles
When you're preparing for a food photography shoot, allow time to take ample shots, photographing the dish from at least three or four different angles. You may be really happy with your initial idea for the shoot, but it may take a little while to nail the best angle for a particular dish. To get the classic overhead shot you see so frequently on Instagram these days, grab a chair or stepstool, so you can get above your food (safely!).
Consider “in progress” shots for recipes and other food-related blog posts
In progress shots, such as the cookie dough mixed in the bowl or the meat cooking on the stove, further add to the story you're telling. As you're preparing for your food photography shoot, jot down a short list of ideas, so you won't forget to take a few in progress shots as you make your dish. Sneak peek or behind the scene shots also make great teaser content on social media. If you’re planning to publish a new recipe later in the week, publish a shot of your ingredient spread in the kitchen or the empty cookie mixing bowl a few days before the recipe goes live.
Shoot with a prime lens
Many food photographers shoot extensively, or even exclusively, with prime lenses. While you may want a zoom lens to capture a few wide angle shots of your spread, most likely you'll want to shoot the majority of your images with a 50mm, 85mm, or even 100mm lens. Getting up close with your food brings people right into your kitchen, which is key for making food enticing when someone can't actually be there smelling and tasting it. Personally, I shoot most of my food photography with a 50mm lens, using a 100mm lens selectively for a few really tight images, such as the hummus image above.
Pick up a diffuser or reflector to minimize shadows
Harsh shadows often leave sections of an image underexposed. For certain types of photography, you may want to create this sort of aesthetic. However, for most food photography, harsh shadows are less than desirable. A diffuser or reflector is a simple, affordable way to minimize the shadows in your food shoot. The easiest, cheapest way to create an effective reflector is to fold a piece of white foam board in half.
Adjust your aperture manually to ensure proper depth of field and focus
Ideally, you want to shoot in manual mode, so you have full control over the ISO, aperture, and shutter speed for your food images. If manual mode is too overwhelming right now (and that's okay!) or you prefer to work with your camera's priority mode, choose aperture priority mode. Take care to shoot with an aperture wide enough to keep the image in proper focus. A few images with a narrow focus to highlight certain aspects of the dish will add to your story. But you don't want all of your shots to have a narrow focus. It's rare I shoot wider than 3.2 for food photography.The 9/21 Photorec.tv Instagram challenge is food. Submit your best food photography images by tagging them #PRTV_food2 and #PRTV. The challenge closes at noon EDT on 9/27. Limit two entries. Recent photos only. Check out the full list of PRTV challenges to participate in future challenges.
Do you have any tips to improve your food photography?
Lighting conditions aren't always ideal for photography. As photographers, we don't always have a lot of control over these conditions either. When you're touring a dimly lit cathedral or attending a wedding in a low light reception hall, you can't exactly bring in a bunch of lighting. Sometimes shooting with a flash solves the problem, but sometimes it doesn't. For certain types of photography, you don't want to use a flash. In other instances, flash isn't allowed, such as during a dance recital or in a museum. Learning to take great pictures in low light will help you make the most of low light shooting situations, producing crisp, high-quality photos with minimal noise and grain.
Select a lens with a wide aperture
The wider the aperture, the more light you're letting into the camera. In low light conditions, the difference between f/4 and f/1.8 is huge. Whenever possible, choose a lens with a maximum aperture of 2.8 or wider (i.e. 1.8, 1.2). When shopping for new gear, look for lenses with image stabilization (IS) or vibration reduction (VR). For many photographers, shooting with a prime lens is the best solution to take great pictures in low light without a flash. You get the wide aperture you need without breaking the bank.For less than $200, you can pick up the Canon EF 50mm f/1.8 STM, Nikon AF FX NIKKOR 50mm f/1.8D, or Canon EF 40mm f/2.8 STM. For less than $500, the Canon EF 85mm f/1.8 USM is another great option. If you're a professional photographer who shoots in low light settings (i.e. wedding reception venues, concert venues) on a regular basis, it's worth spending more and investing in a zoom lens with a wide aperture as well, such as the Canon EF 24-70mm f2.8L II USM or Canon 70-200mm f/2.8L IS II USM.Related: Recommended Canon Prime Lenses
Slow down your shutter speed
The slower the shutter speed, the more light you're letting into the camera. For handheld shooting, it's recommended not to shoot longer than 1/60. If you're trying to freeze action, keep your shutter speed at or above 1/200. Depending on the given conditions, flash may not be allowed, but you may be able to use a tripod. Shooting with a tripod enables you to slow down your shutter speed significantly below what you would be able to accomplish handheld. Using a remote shutter release further minimizes shake. When you shoot with a tripod, turn off image stabilization or vibration reduction. When you're shooting in low light without a tripod, you can keep your shutter speed low by bracing yourself against a wall or other solid object. Relax as much as possible to keep your hands steady.Keep in mind slowing down your shutter speed is preferable for compositions without people or moving objects, such as night landscapes and city skylines. Unless you're trying to create motion blur, your images will be soft without much detail. There are certain scenarios where you may not want tack sharp images or may even want a certain amount of blur, such as creative portraiture or other fine art photography. However, it's important to be aware of the effect you're trying to achieve, so you can dial in your settings accordingly.Related: Shutter Speed Basics
Bump up your ISO
There is a stigma in the photography industry against high ISO. While it's always preferable to keep ISO as low as possible to avoid noise and grain, high ISO range exists for a reason. In low light, it's worth the sacrifice of a little bit of noise and grain to create a well-lit image. When you're shooting with a DSLR camera and fast prime or zoom lens, the noise will be minimal, particularly when you shoot at ISO 1600 or lower. Unless you're printing images larger than 5x7, it's unlikely the noise will be much of an issue. Additionally, a noisy image is always better than a blurry image. You can brighten an image in post-production, but you can't fix blur. Set your shutter speed, and then raise or lower your ISO accordingly.Related: Raise Your ISO for Better Quality Photos
Shoot in aperture priority or manual mode
In low light conditions, some photographers prefer to shoot in aperture priority (A or Av) mode. Selecting aperture priority mode enables you to dial in the widest aperture available, ensuring every single shot will be at this aperture. You get a peace of mind knowing your shots will have a wide aperture without having to select shutter speed and ISO for every single image. If aperture priority mode doesn't give you quite enough control, switch to manual mode. For example, sometimes in low light settings, the camera will automatically select shutter speeds slower than 1/60 to accommodate for the low lighting, greatly increasing the risk of motion blur. Shooting in manual mode and selecting both aperture and shutter speed eliminates this risk.Related: Making the Transition from Auto Mode to Manual Mode
Shoot RAW
Shooting RAW gives you full control over your image. When a JPEG image has detail lost in blown out areas or heavy shadows, the detail is lost forever. When a RAW image has blown out areas or more likely in the case of a low light environment, heavy shadows, you'll be able to recover some of the detail in post-production. While it's still important to strive to create properly exposed images, you'll be able to retain and recover a lot more detail in your RAW files than you will in your JPEG files.Related: Why You Shouldn't Be Afraid of Shooting RAW
Embrace the opportunity to shoot a long exposure
Shooting long exposures isn't an option in all low lighting settings. However, in the right settings, it offers a whole new world of photographic possibilities. Blurring moving water, clouds in the sky, the headlights and taillights on vehicles, or people in a crowd creates a distinct, striking aesthetic that isn't possible with a shorter exposure. Make sure to bring a tripod if you want to experiment with long exposures.Related: Photographing WaterfallsWhen you know you'll be shooting in low light, plan ahead. Bring at least one prime lens and a tripod as well as a small flashlight or other portable light source, so you can access your camera controls without fumbling in the dark.
Do you have any additional tips to help photographers take great pictures in low light without a flash?
Summer is an amazing time for outdoor photography. With long days, warm weather, and tons of special events, there are endless possibilities for creative shooting. From early mornings capturing the sunrise to busy days photographing weddings to evenings documenting the local fair, summer is a magical season. Equipped with a few critical tips, you'll be able to step up your summer photography game and make the most of your shooting throughout the entire season.
Assess the condition of your gear
The start of a new season is a perfect opportunity to evaluate the condition of your photography gear, including lenses, bags, straps, and other accessories. Repair or replace any items that are broken or damaged. If you've been itching to upgrade your camera body, invest in a new lens, or try a new accessory, think about taking the plunge now.
Invest in circular polarizers
I always have circular polarizers in my bag, but I pull them out in the summer more than any other season. A circular polarizer (CPL) is like sunglasses for your camera lens. When you're shooting in bright outdoor conditions, a CPL filter helps reduce blown out areas and saturate colors, creating richer, more balanced images.
If applicable, pick up a few summer props
For family photographers, a carefully selected bag of props goes a long way toward adding character to sessions. You may even want to bring a few items to your engagement couple sessions. Vintage step stools in a field are a popular option. Blankets, balloons, and sweet summer treats (i.e. lollipops, ice cream) are perfect as well. When you're shooting in an iconic summer location, such as a county fair or beach, make sure to frame your subjects to highlight the summer imagery.
Streamline your gear management system
Juggling gear wastes time and energy, particularly when it's hot outside. Be honest about the gear you'll need for a given event or outing, and leave everything else at home. You may need to develop multiple gear management setups to cater to varying shooting needs. For example, a large backpack may be ideal for day hikes while a small shoulder bag is preferable for a quick newborn or engagement session. If you wear a camera or cameras, invest in a comfortable strap or strap system, so the weight is well distributed and you can access your gear quickly and easily.
Equip yourself and your clients for long hours in the sun
Unless your summer photography is limited to early morning sunrises and golden hour portrait sessions, most likely you'll be out shooting during some of the hottest and brightest hours of the day. Even when you're striving to shoot in soft, flattering light, inevitably you'll end up taking pictures in the sun during family vacations, gatherings with family and friends (i.e. birthday parties, bridal showers), and other mid-day events. Bring sunglasses, sunscreen, and a hat to protect yourself. Encourage clients to bring the gear they need to protect themselves from the sun as well.When you're working with clients for summer portrait sessions and events, keep hair product on hand to minimize frizz. During a consultation prior to a session, recommend clothing that will be flattering in hot weather, including lightweight, breathable fabrics, as well as hairstyles. For example, a braid or updo may be preferable to big, loose curls.On the hottest days of the year, reassure clients that they will be spending a minimum amount of time in direct sunlight with broiling temperatures. When a family steps out of their car and is immediately shielding their eyes from the sun or a bride is breaking into a sweat before the ceremony is over, the last thing they want to hear is that they'll be standing right in the sun for their pictures. Spend as much time in the shade as possible, take breaks in an air-conditioned building or vehicle as needed, and take care not to push anyone past their comfort limit.
Dress appropriately and comfortably for the current weather conditions
Once you've prepared for your clients for their photography sessions and big events, follow your own advice to look your best, even when it's sticky and humid. Select clothing and footwear that will hold up well in the hot weather and keep you comfortable through long hours on your feet. When you're shooting on your own, you don't have to be concerned about looking professional. For example, lady photographers may prefer to wear dressy sandals with clients but would rather put on sneakers when heading out for hikes with friends.
Be prepared for a sudden change in weather
Summer storms often come on very quickly with little or no warning. When you're outdoors in the evening for a golden hour family session or some personal shooting at a favorite beach or park, the temperature may drop quickly as the sun sets. At a minimum, travel with a waterproof camera bag and camera rain cover as well as a long-sleeved shirt or jacket, so you won't find yourself freezing or with wet camera gear. Depending on the forecast for a given day, you may want to bring additional supplies, such rain boots, an umbrella, or a wind breaker.
Have water and snacks on hand
Summery photography can get miserable when you're thirsty and hungry. Don't ever leave the house on a warm summer day without a water bottle or two and a few snacks. Pack food items that you will keep you full and energized and that will hold up in the heat, such as granola bars, dried fruit and nuts, rice cakes with almond butter, and beef jerky.
Keep a running list of summer photography ideas
Whether you're looking for new places to visit around town with family or friends or you want to keep your client sessions fresh and interesting, having an ongoing list of summer photography ideas will keep your creative juices flowing. Create a list on your phone or stash a small notebook in your camera bag, so you can jot down ideas while you're on the go. Make note of upcoming events to attend as well, such as fairs, festivals, and concerts.
Challenge yourself
Long days and warm weather create an ideal environment for setting some new photography goals and challenges. Take advantage of an evening wedding reception to practice your back lit portrait technique or push yourself to edit an entire set of images in black and white. The PRTV Instagram challenges are also a great way to get out and shoot different subjects every week of the summer.
Do you have any additional tips for summer photography?
Making the transition from auto mode to manual mode is a tough process for most amateur photographers. You're familiar with the terms ISO, aperture, and shutter speed. But you don't really understand any of these terms, let alone how they work together. Typically, beginner photographers leave their cameras in auto mode because they think their cameras will select better settings than they will. However, as soon as you start learning the camera settings, you'll start making better selections, consequently, creating higher quality images. The process of making the transition from auto mode to manual mode isn't easy. But it's well worth the effort.Shooting in manual mode is a lot like riding a bicycle or learning to drive a stick shift. Even with great teaching, at some point, you just have to jump in and attempt it on your own, knowing you'll make a lot of mistakes. I've spent years shooting in manual made. While I do feel comfortable with it, I still make plenty of mistakes. Until I started keeping my camera in manual mode the majority of the time I was shooting, I didn't fully appreciate how much power and freedom it would offer. I promise that when you give it a try, you'll quickly experience this same power and freedom, and you won't want to go back.In making the transition from auto mode to manual mode, I cover the following tips.
Learn everything that you can about manual camera settings
Start paying attention to your settings while shooting in auto mode
Start using your auto settings as a guide for shooting in manual mode
Attempt shots that require you to use a manual mode
Shoot in manual mode in controlled light settings
Seek out opportunities to practice manual mode on your own or with fellow photographers
Reflections are a tricky subject. Sometimes it's all but impossible to avoid a harsh glare in a subject's glasses. Other times the light turns just the right way, so an ordinary location transforms into a stunning scene. Learning a few simple tips for great reflection photos helps you maximize the potential of a beautiful reflection scene, creating a one of a kind image.
Select a high f/stop number. Choosing an f/stop of 11 or higher brings the entire scene into focus, enhancing the reflection aesthetic. The f/stop for the photo above is f/22. Once you've settled on your f/stop, play around with the focus. In some instances, it may be preferable to focus on the subject, while in other cases, it may be preferable to focus on the reflection.
Think about the angle of the reflection. Explore different viewpoints for the reflection scene, paying attention to the reflection from each viewpoint. In a natural setting, your vantage points may be limited. In the studio, you'll have more control over the best angle for a given subject and its reflection.
Don't forget the basic rules of composition. It's hard to take a bad picture of a stunning natural reflection. However, you'll turn a good photo into a great photo by composing it properly. Instead of snapping a couple of pictures and moving on, take a few minutes to set up your image. Pay attention to the rule of thirds, leading lines, and framing.
A post shared by George Kossieris (@gkossieris) on
Whenever possible, shoot during the first or last hours of the day. The first and last hours of the day offer the softest light, minimizing harsh glare and smoothing out reflections. When you're shooting in the middle of the day, take care to limit shadows and blown out areas and bring out the colors.
Shoot with a circular polarizer or neutral density filter. Filters aren't necessary for great reflection photos but do increase your options for shooting. A circular polarizer will help you control the amount of shine in the reflection while deepening the colors and minimizing the blown out areas. A neutral density filter cuts the available light, allowing you to shoot long exposures.
Use a tripod to experiment with different shutter speeds. Shooting a long exposure is a popular technique for water reflection photos. Smoothing out the water changes the aesthetic of the photo significantly, softening the image and drawing attention to the subject.
Consider reflection surfaces besides water. When people think of reflection photos, their minds often go to water reflections. However, you shouldn't feel limited to this option. You can create great reflection photos with virtually any surface that produces a reflection from glass windows to mirrored sunglasses and even jewelry.
In the studio, experiment with lighting a subject from above or behind. Shiny surfaces don't absorb light. As such, it's important to think about the amount and angle of the light in relation to the shooting surface. You may produce better results lighting your subject from above or behind than the front or side.
Limit use of flash. While there are exceptions to the rule, in general, using flash isn't advisable for reflection photography. In most cases, the light will simply bounce right back at you, distracting from the subject. If I had used a flash to light the cake, it would have flashed right on the ring, making it impossible to see the reflection.
A post shared by Liselotte Berg 🇸🇪 (@littlel1970) on
Experiment with creating both realistic and abstract compositions. Shooting reflections allows for a wide spectrum of creativity. You may strive to produce a realistic image that mimics what you see in real life, or you may strive to produce an abstract image. For example, you might choose to shoot a street puddle reflection in manual focus to blur the bright lights.
Bonus tip! Finally, keep your eyes open for stunning opportunities to photograph reflection. You never know when you'll come across a beautiful bridge centered over a flowing river or the light will strike just right and highlight the boats in the harbor.The images in this post not embedded from Instagram are my own images. The embedded images from Instagram are from members of the Photorec community with the tags #PRTV and #reflection. Consider becoming a PRTV member and joining the support group today!The 4/29 PRTV Instagram challenge is reflection. Use the hashtags #PRTV_reflection and #PRTV on Instagram to enter up to two of your great reflection photos for the challenge. Entries are due by noon Friday (5/5). Winners are announced the following Saturday (5/6) with the start of a new challenge.
Do you have any additional tips for great reflection photos?
I spent a weekend with McKay Photography Academy in Washington DC - Photographing the monuments and memorials at sunrise, sunset, the Cherry Blossom festival and all the cherry blossom trees around the tidal basin and Jefferson Memorials. Watch for tips on photographing sunrise, sunset and the monuments plus all our adventures!https://youtu.be/TmeuOMguXJk TWO MORE DAYS TO ENTER TO WIN A TRIPJoin me on a future trip - Yosemite NP, Glacier NP, the Arctic - learn more at http://photorec.tv/travel
I got inspired to write about shooting RAW after a friend left a comment on a photography post on my blog about how many photographers are afraid to shoot RAW. She thinks that this is a mistake, and I completely agree. I also fully understand that for numerous photographers, shooting RAW seems very overwhelming or is total unknown territory.Full disclosure: When I purchased my first DSLR in late 2012, I had never heard of RAW and didn't know why you would shoot RAW versus JPEG. Even as I did become familiar with the concept of RAW, I didn't switch to shooting RAW right away. I had just started using Photoshop Elements, I'd never used Lightroom, and I didn't understand the power of shooting RAW. So I kept shooting JPEGs.Fast forward six months to when I finally took the plunge, bought Lightroom, and shot my first set of RAW files. When I imported the files into Lightroom and started editing them, I couldn't believe the difference. I knew next to nothing about editing in Lightroom and still saw a significant improvement in my editing and consequently, final images. I've never looked back.If I had known that editing RAW files in Lightroom was so intuitive and that I'd see such a difference in my photos, I would have started shooting RAW immediately after purchasing a DSLR. If you've been on the fence, don't put it off any longer!In my shooting RAW post, I take you through the following points.
What does "shooting RAW" mean?
How do I shoot RAW?
Uploading and editing RAW files seems like a lot of work. Does it really make a difference?
But isn't it difficult and time-consuming to edit RAW files?
But isn't photography software expensive? I like using free photography programs.
But don't RAW files take up a lot of space?
I also take you through examples of editing JPEG and RAW versions of a single image. It's very difficult to appreciate the difference between shooting JPEG and RAW fully until you've tried it for yourself. But hopefully, learning more about RAW and reviewing examples of RAW versus JPEG images will help you make the decision to invest in Lightroom and start shooting RAW.Read the full post over on roseclearfield.com: DSLR Photography 101: Don't Be Afraid of Shooting RAW.SaveSaveSave
The beach is an ideal setting for photography. With sparkling water and a blue sky, how can you take a bad picture? However, when you snap pictures quickly in auto mode without thinking much about your composition, they often turn out dull or washed out with no clear subject or visual point of interest. A few tips for better beach photography will help you turn your mediocre, amateur beach snaps into professional, polished images.
Straighten the horizon
Arguably, the single biggest mistake people make with beach photos is shooting a crooked horizon. Straightening the horizon instantly improves any beach photo. When you're shooting, pay attention to your horizon to get it as straight as possible in camera. Then make any final adjustments during post-process to ensure it's completely straight.There are a couple of different ways to straighten the horizon in Lightroom. Both straightening tools are located in the Crop options box. The first tool is a visual rotation tool. After you've clicked on the Crop tool and the grid has appeared, hover your mouse outside of the photo until a double arrow appears. Drag the cursor until you've straightened the horizon.The second tool is the ruler or straighten tool in the Crop options box. Click and drag it over to the crooked horizon. You can drag it over the whole horizon or just a portion of it. Lightroom will calculate how far off it is from the horizon level, and rotate the image accordingly to correct it.You can also fix crooked pictures with Lightroom's guided transform tool. Watch the video below for more details.
A circular polarizer (CPL) filter is like sunglasses for your camera. When you're shooting on a bright sunny day, a circular polarizer creates rich, detailed photos. Circular polarizer filters are particularly important when shooting beach scenes because they allow you to cut down on glare on the water and bring out the color in the water and the sky, creating a more vibrant, balanced image.
Focus on the details
Amateur photographers walk up to a beautiful scene, snap a picture, and keep moving. While a simple beach composition showcasing the sand and water may be stunning, spending a few minutes taking in the entire scenes will reveal other possible shots.
The current light conditions greatly affect the look of the beach at any given moment. Watching the light and planning to take pictures at certain times of the day will enable you to create images that simply aren't possible in harsh mid-day sun. I like to use timeanddate.com to keep track of the current sunrise and sunset times as well as moonrise and moonset times. The Photographer's Ephemeris and Sunseeker provide even more details about the direction of the light and shadow length.
Back lighting is another fantastic lighting technique to experiment with at the beach. Lighting a subject from behind instead of the front or side often proves more difficult, but when executed properly, offers fantastic results. Trelina shares a beautiful example with one of her daughters, back lit on a sunny day at the beach.
Shooting with different depths of field is a simple, effective way to change the focus in an image. I love to find an interesting rock or a grouping of wild plants and then position the water behind it. When you've found a subject of interest, switch your camera to Aperture Priority (Av or A) mode. Dial in a wide aperture (i.e. 1.8, 2.2) and take a few shots, then slowly work your way to a narrow aperture (i.e. 16, 22), taking pictures at each aperture. See which aperture setting you like best for your subject and the overall composition.
Setting up a tripod on the beach and photographing long exposures of the water is a popular technique. If you've never attempted a long exposure, it's definitely worth trying at least once or twice. Generally, you'll have the best results with long exposures during the golden hours of the day when the light is low on the horizon. If you enjoy shooting long exposures, invest in a set of neutral density filters. Neutral density filters reduce the amount of light entering the camera, allowing for even longer exposures.
Frequent favorite spots in different seasons
One of my favorite aspects of living near Lake Michigan is visiting favorite spots throughout the year and photographing them in different seasons. It's fascinating to see how the landscape changes from one season to next and how those changes affect the shooting conditions. A lakeside setting takes on a completely different aesthetic with colorful fall trees than it does with stark winter trees.
Shoot in manual mode
Shooting in manual mode gives you more control over your images. Shooting in auto mode at the beach means you'll often end up with a blown-out sky and water without much detail. When you shoot in manual mode, you can select the settings to create rich, detailed images with minimal harsh shadows and blown-out areas. If you're brand new to DSLR photography or have only shot in auto mode, it's intimidating to make the transition to manual mode. However, it's well worth the effort. Start in aperture priority or shutter priority mode, and build your skills from there.Further reading: Making the Transition from Auto Mode to Manual Mode
Copyright: Josh Hairsine
Shoot in RAW
Shooting in RAW gives you even more control over your images. A RAW file is the image that a camera sensor sees. When you shoot a JPEG, the camera processes the image for you, making a lot of the editing decisions. Once it's made these decisions, you can't recover detail that gets lost.For example, if the clouds are very bright with blown-out areas, you won't be able to get much detail back.On the flip side, if an image has deep shadows, the detail in these shadows is lost in a JPEG. Finally, shooting RAW enables complete control over an image's white balance. Instead of selecting a white balance in camera, you can shoot with any white balance setting and then adjust the final white balance in your editing program.Further reading: DSLR Photography 101: Don't Be Afraid of Shooting RAW
Use Lightroom's adjustment brushes
Beach landscapes often have varied lighting, which makes it difficult to capture the entire scene in full detail with balanced light. Our eyes process the varied lighting without us even realizing it in a way that cameras can't. You see numerous beach photos with harsh shadows and/or blown out skies. Many people fine tune their exposures for landscape photos, including beach photos, by using spot metering. You can further perfect your images in post-process by using Lightroom's adjustment brushes.Over years of editing beach photos, I've created adjustment brushes for editing bright skies, cloudy skies, and long exposure water. I've used these brushes in nearly every image I've shared in this post and am sharing them with you. Adjustment brushes allow you edit select sections of a photo. Creating your own adjustment brushes for edits you make over and over again streamlines the post-processing routine, so you can edit more quickly. As with any brush, action, or pre-set, typically, you'll have to tweak these brushes a bit for best results.Download your sky and water adjustment brushes! After you've saved the folder, open Lightroom. Go to Edit > Preferences. Click on the Presets tab, and then the "Show Lightroom Presets Folder" button. Open the "Local Adjustment Presets" folder. Paste your new adjustment brushes in this folder. You may need to restart Lightroom before you can see the adjustment brushes.Finally, keep your eyes open, so you can seize great opportunities for photos at the beach as they happen. Beach scenes change quickly, sometimes minute to minute as the light changes or the weather shifts. Brilliant colors appear, and then the next minute the entire scene is quiet and blue again. A fantastic boat will appear, but it's moving quickly, which means you only have seconds to get the shot. You don't want to miss these fleeting changes to capture stunning scenery.I first saw this rainbow from my house. It was one of those drop everything and grab your camera moments. I was fortunate the rainbow stuck around long enough that I was able to get more than a couple of shots. You can see the full set on my blog.I actually took this last shot with my phone. I was out for a walk with my husband and didn't have my DSLR with me. We walk on the beach nearly every week when the weather's nice, and I'd never seen this occur before. When I did return the next day with my DSLR, the landscape had completely changed. I'm so glad I got the shot with my phone.
The images in this post without a noted copyright are my own images. You can see more of my photography on Instagram and my blog. The photographers who contributed photos to this post are members of the PRTV support group. Thank you for sharing your images! Learn more about becoming a PRTV member and joining our support group.
Do you have any additional tips for better beach photography?
Whether or not you hate it, or lost sleep, a good chunk of the US and Europe has to deal with daylight savings time. Being that summer is coming it's time to turn the clock forward an hour on your cameras, and fix any metadata for photos taken since then.
Canon
Press Menu
Use the right arrow / af button until you reach the second settings wrench tab
Use down button to select Date/Time
Press set to select
Use the right button to reach the sun for daylight savings time
Press set to select
Use down button to turn on daylight savings time
Press set to confirm
Daylight savings time is on (spring forward one hour)
Daylight savings time is off (fall back one hour)
Nikon
Press Menu
Press down to wrench/settings tab
Press down to go to Daylight saving time
Press right to turn daylight saving time on
Press OK
Sony
Press Menu
Press right to select briefcase/camera settings tab
Scroll down to Date/Time Setup
Press Enter
Daylight Savings should be selected, press enter
Press up to select on to spring forward an hour
Press Enter
Edit Time in Lightroom
Quick Tip: This method is also helpful when traveling to a different time zone and you forgot to switch your camera's time.
While in the Library module select your photo(s)
At the top click metadata then select edit capture time
Select shift by set number of hours (time zone adjust)
As it's daylight savings time select +1 as the new time
I have a quick hack for using the new instagram multi image feature to actually just share ONE giant panorama. Scroll down for video on how-to share a giant Panorama on Instagram.
Here is the Panorama I want to share
Posting it to Instagram results in this VERY limited view
But with this trick you can share the WHOLE image in a big, Panorific way
February and March are typically the snowiest month for much of North America - When you are photographing falling snow think about the mood you want to convey and decide which shutter speed is right for you. Your aperture will play a role here too. Large apertures/shallow depth of field will produce bigger out of focus flakes and a smaller aperture/larger depth of field will produce smaller flakes.Shutter Speed can be used to convey motion! I often use a slow shutter speed when photographing rushing water to smooth it all out, creating a peaceful scene. Or you can pan the camera at slower shutter speeds while tracking a subject creating motion blur everywhere except your subject. You can see these techniques and more in my shutter speed video below. In this post I just want to share the effects of shutter speed on falling snow. Depending on the speed and size of the snowflakes your results may vary slightly but experiment and see what works best for your scene and the mood you are trying to convey. https://www.youtube.com/watch?v=LER6RFkkj68


 The holidays are an ideal opportunity to capture images with friends and family. Taking a few extra minutes to snap photos during a holiday gathering will allow you to look back on the event for years to come. Before you gather with your loved ones this year, brush up on key tips for taking better holiday photos.
 Focus on telling a story
 Strive to get a combination of candid and posed shots
 Get on eye level with the kids
 Shoot with a prime lens or external flash
 If the weather allows for it, move outside for a few shots
 Keep your camera handy
 Find the best natural light in your house
 Alternatively, use artificial lighting
 Minimize clutter in your shooting space
 Add a garnish or other finishing touch to your dish
 Style your food with nice dishes and a couple of props
 Clean up any drops and splatters
 Experiment with different angles
 Consider “in progress” shots for recipes and other food-related blog posts
 Shoot with a prime lens
 Pick up a diffuser or reflector to minimize shadows
 Lighting conditions aren't always ideal for photography. As photographers, we don't always have a lot of control over these conditions either. When you're touring a dimly lit cathedral or attending a wedding in a low light reception hall, you can't exactly bring in a bunch of lighting. Sometimes shooting with a flash solves the problem, but sometimes it doesn't. For certain types of photography, you don't want to use a flash. In other instances, flash isn't allowed, such as during a dance recital or in a museum. Learning to take great pictures in low light will help you make the most of low light shooting situations, producing crisp, high-quality photos with minimal noise and grain.


 Summer is an amazing time for outdoor photography. With long days, warm weather, and tons of special events, there are endless possibilities for creative shooting. From early mornings capturing the sunrise to busy days photographing weddings to evenings documenting the local fair, summer is a magical season. Equipped with a few critical tips, you'll be able to step up your summer photography game and make the most of your shooting throughout the entire season.


 Making the transition from auto mode to manual mode is a tough process for most amateur photographers. You're familiar with the terms ISO, aperture, and shutter speed. But you don't really understand any of these terms, let alone how they work together. Typically, beginner photographers leave their cameras in auto mode because they think their cameras will select better settings than they will. However, as soon as you start learning the camera settings, you'll start making better selections, consequently, creating higher quality images. The process of making the transition from auto mode to manual mode isn't easy. But it's well worth the effort.Shooting in manual mode is a lot like riding a bicycle or learning to drive a stick shift. Even with great teaching, at some point, you just have to jump in and attempt it on your own, knowing you'll make a lot of mistakes. I've spent years shooting in manual made. While I do feel comfortable with it, I still make plenty of mistakes. Until I started keeping my camera in manual mode the majority of the time I was shooting, I didn't fully appreciate how much power and freedom it would offer. I promise that when you give it a try, you'll quickly experience this same power and freedom, and you won't want to go back.In making the transition from auto mode to manual mode, I cover the following tips.
 Reflections are a tricky subject. Sometimes it's all but impossible to avoid a harsh glare in a subject's glasses. Other times the light turns just the right way, so an ordinary location transforms into a stunning scene. Learning a few simple tips for great reflection photos helps you maximize the potential of a beautiful reflection scene, creating a one of a kind image.


 I got inspired to write about shooting RAW after a friend left a comment on a photography post on
  The beach is an ideal setting for photography. With sparkling water and a blue sky, how can you take a bad picture? However, when you snap pictures quickly in auto mode without thinking much about your composition, they often turn out dull or washed out with no clear subject or visual point of interest. A few tips for better beach photography will help you turn your mediocre, amateur beach snaps into professional, polished images.


 For example, if the clouds are very bright with blown-out areas, you won't be able to get much detail back.
 On the flip side, if an image has deep shadows, the detail in these shadows is lost in a JPEG. Finally, shooting RAW enables complete control over an image's white balance. Instead of selecting a white balance in camera, you can shoot with any white balance setting and then adjust the final white balance in your editing program.Further reading:
  I first saw this rainbow from my house. It was one of those drop everything and grab your camera moments. I was fortunate the rainbow stuck around long enough that I was able to get more than a couple of shots. You can see the full set
  I actually took this last shot with my phone. I was out for a walk with my husband and didn't have my DSLR with me. We walk on the beach nearly every week when the weather's nice, and I'd never seen this occur before. When I did return the next day with my DSLR, the landscape had completely changed. I'm so glad I got the shot with my phone.


 Depending on the speed and size of the snowflakes your results may vary slightly but experiment and see what works best for your scene and the mood you are trying to convey. https://www.youtube.com/watch?v=LER6RFkkj68

